Thursday, December 20, 2012

Impromptu Pickling

Yesterday was our last day of school before winter break. We had so much to accomplish before the end of the year 2012! We were still exploring the connection of wax candles to crayons, plus continuing our potato experiments, both Chanukah topics in need of a conclusion.

Even with so much to do, as a Reggio-inspired school, we try to live in the moment and seize opportunities as they present themselves.

With a long break approaching, we knew that we would not be able to finish all of the cucumbers generously brought in by our Fruit and Veggie parent. We asked ourselves, what can we do with these wonderful cucumbers?? And that's when inspiration struck: Make pickles!


We sliced the cukes, mixed together water, salt, vinegar, sugar and pickling spice and put it all into a pitcher. We put the pitcher in our refrigerator look forward to enjoying pickles in 2013!


Art & Cooperative Learning


Yesterday's 68-degree weather was a perfect opportunity to take our Extended Day learning outdoors.

When the children ventured outside, they were greeted by an inviting setup: a long surface of poster boards with trays of brightly colored paint and a variety of mark-making tools at one end.

Once the children were seated, I explained that today we were going to make one large painting together. Each child would get a turn to choose their "brush" (roller sponges, toothbrushes, combs, stamps, etc.) and make a line with it down the paper. The definition of "line" was very open-ended, as the dotted lines created with stamps still qualify as lines here. "A continuous collection of similar marks," might be the best way to think of "line" in this instance.

The challenge: Can you make your marks without overlapping those of your friends?

The social-emotional undercurrent of this lesson is subtle, but crucial. In participating in this activity, children must:

-make their own (artistic) choices
-pay attention to what their friends are doing
-make their own choices based on those of their friends. If the challenge is not to paint over someone else's work, then they must be very mindful, and tune into each others' actions on a deeper level than they might typically .

The first mark! A striped sponge roller and red paint.
Working together
A very clever way to avoid "stepping" on someone else's art: note the green bird prints in between the yellow paw prints.
With such a wide surface, two friends at a time can work on this.


The finished product is hanging in the room where we meet each day at 1:00 to begin our Extended Day program (a mixed age group of 3-, 4-, and 5-year-olds). My wish is that it reminds the children of how well they can work together, and inspires them to always treat each other with the kindness and respect they showed each other that day.

Wednesday, December 19, 2012

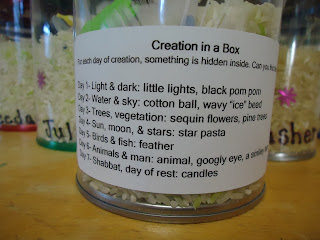
Creation...in a box!

How do you fit all 6 days of creation, plus Shabbat in a box? We managed to do it in Kitah Alef Bet!

While the ideas of Parshat Bereishit (Genesis) have woven their way through the first half of our year, it culminated in the making of this eye-spy box.


A sticker on each box describes what to look for, and what each item symbolizes.
Each classmate took home their own. The tops are sealed with hot glue and tape.
  

In small groups, a Morah helped us fill up our boxes, explaining why we were including each item. We have been discussing this concept during Circle Time by using pictures clipped from magazines as a conversation starter. The teacher might point to a photo of animals and ask, "Who created all of the animals in the whole world?" As we go through different pictures (e.g. the sun and moon, a family, salad and food...) we conclude that Hashem is responsible for it all.

We asked the kids, "What else did Hashem make?" Naturally, our kids made the connection between this question and things their grown-ups make at home. "Mommy makes peas at home," was one response. Some kids took to the idea of the natural world as examples of things Hashem created, and gave answers like, "the sky," or "flowers."

The beauty of this "Big Concept" is that it grows along with them. We are happy to introduce them to it with this fun eye-spy game!


Tuesday, December 18, 2012

December Self Portraits

KDH continues to explore different ways to make self portraits. This month we discussed symmetry and used that information to create our self portraits. First we defined symmetry. Next we asked, "What are some things that are symmetrical?" "Butterflies, heart shapes, and yes, our faces as well as our bodies." We took mirrors and used them to create symmetrical images.
Each child was given a picture of half of his/her face, with the picture ending down the middle of the face, at the line of symmetry.The children drew the other half of their faces, necks and shoulders. 


We're so excited with the results. Please come in and admire!

Morah Ruth

Monday, December 17, 2012

Our Sensationally Sticky ABC's


Sensory activities generally aim to teach children about their worlds through direct action on it, learning about the characteristics of a material, its capabilities and limitations through experience with it.

Along with this, it is also an opportunity for building vocabulary and practicing the cycle of conversation with peers.

Some materials lend themselves to letter formation as well. Shaving cream, for example, can be used to make letters and encourage the children to recognize and name them.

Then comes the fun part:


Some friends were shy at first and only wanted to put fingertips in the shaving cream. Others dove right in, smooshing the cream between their hands and seeing what would happen if they clapped hands full of shaving cream (much to the surprise of those sitting next to them!)

Shaving cream is an everyday material. Some kids even knew what it was and said, "My daddy uses that!" But it becomes extraordinary when given the opportunity to explore it so deeply and freely.


Ziva said, "It's sticky!"


Laylah said, "I like how it feels."


The children discovered that they can use their hands in different ways to make different designs. You can point one finger to make a single line, or rake all the fingers on your hand along the bin to make many lines at once.


We all went home smelling delightfully fresh!

Morning Routine in Kitah Gimmel

I am so pleased with how competent the children in our classroom are.  Each morning they follow our routine so easily and happily.  What makes me most proud is that it was not always so.  This is somewhat of a milestone for us as a group, so I would like to share. 


The children know their name and their cubby space and eagerly put their lunch and/or backpack away.


The children take on and off their coats with a lot of effort, sometimes all by themselves and sometimes with help.


The children "sign in" establishing that they are "here".  They find their picture and match it to their printed name.  (Asher is showing Sholom and Jonah that he has" a letter like e but its not")


Some children then go to look at the message of  the day, I guess the excitement of wondering what it might say?


And some of us go straight to getting busy exercising our little fingers or any of the other many activities set out for us to work with.


Sometimes children even get the opportunity to practice having patience (and chatting with a friend) while waiting for a turn at an activity.

Thursday, December 13, 2012

Apple sauce made by KDH chefs


How do you like to eat your latkes? How about with applesauce? How does KDH make apple sauce?
We used red delicious apples because we like our applesauce sweet.
1. Wash the apples.
2. Cut up the apples.
3. Put into pot with a small amount of water.
4. Cook until apples are soft.
5. Put cooked apples into Foley Food Mill.
6. Turn the handle and watch as the apples are mashed.
7. Serve and eat with yummy latkes!


Tuesday, December 11, 2012

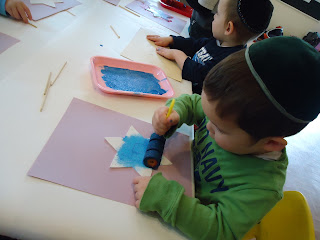
Printmaking-- With Hebrew Letters!


Our letter of the week was ח - "chet" for חנוכה (Chanukah)! To help us learn how to make the shape of the letter, we made prints.

First we used a wooden tool to carve a "chet" into a foam star shape. We could also add any designs that we wanted.
Next we used foam rollers to cover our stars with a thin layer of paint
Then we put a fresh sheet of paper on top of the paint-covered star...
...And we pressed it, pressed it, pressed it, with a flat hand, making sure to go over all the edges.


The finished images are like snowflakes- each one is unique! We noticed that the letters become reversed when you make an impression of them. This is a great observation about the nature of printmaking- everything you carve or create will be flipped.
The foam stars can be used at home to make even more prints, and in different colors depending on your paint supply. Happy printing!